

ASE (Atomic Simulation Environment)を用いた表面構造の作成
Last Update:2023/07/13
はじめに
このページでは、ASEを用いてAg(111)表面構造(スラブ構造)を作る方法について説明します。
構造データ(cif file)の準備
ここでは、Materials Project(https://materialsproject.org/)から構造のもととなるファイルをダウンロードすることにします。Materials Projectの利用にはログインが必要ですが、gmailアカウントを用いてログイン可能です。
今回は簡単な例として、Ag(111)の表面構造を作ります。
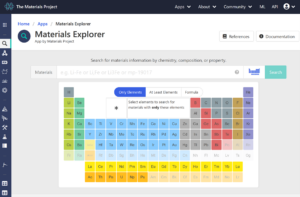
まず、上部メニューの「Apps」からMaterials Explorerをクリックします。
Agをクリックした後、searchをクリックすると、いくつか候補が出てきます。
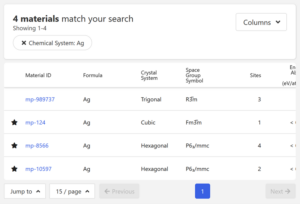
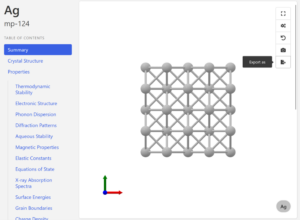
今回はIDがmp-124のものを使用することにします。
構造図の右上のExportボタンからcifファイルをダウンロードします。
表面構造(スラブ構造)の作成
ASEはPythonベースで書かれています。Pythonでコードを書き、Primitive cellのcifファイルを読み込み、表面構造を作成し、cifファイル形式で出力することを考えます。
まずは、Ag(111)の表面構造を5層つくり、周期系計算の場合に上下の原子で相互作用が生じないように真空領域を10Å挿入することにします。
下記にサンプルコードを示します。
'''
Surface builder by using ASE (https://wiki.fysik.dtu.dk/ase/index.html)
    * Installation
        https://wiki.fysik.dtu.dk/ase/install.html

    * Usage
        Prepare a ciffile of a primitive cell
        and information of a surface Miller index and the number of layers.
        Execute the following:
        $ python3 surface_builder_ase.py input.cif output.cif

'''

import os
import sys
import numpy as np

def edit_structure_ase(filename_input,filename_output):
    ### Reference:
    ### https://wiki.fysik.dtu.dk/ase/ase/atoms.html
    ### https://wiki.fysik.dtu.dk/ase/ase/build/surface.html?highlight=ase%20build%20surface#ase.build.surface
    ### https://wiki.fysik.dtu.dk/ase/ase/build/tools.html

    from ase import io
    from ase import Atoms
    from ase.build import surface, cut, add_vacuum

    #####################
    ### read cif file ###
    #####################
    atoms_input = io.read(filename=filename_input)


    #####################
    ### build surface ###
    #####################
    indices = (1,1,1)  # Miller index
    layers = 5 # number of layers
    vacuum = 10.0 # vacuum thickness

    ### ase.build.surface(lattice, indices, layers, vacuum=None(Ang), tol=1e-10, periodic=False)
    atoms = surface(atoms_input, indices, layers, vacuum)
    ### ###


    ######################
    ### write cif file ###
    ######################
    io.write(filename=filename_output, images=atoms)

    return

if __name__ == '__main__':
    filename_input=sys.argv[1]
    filename_output=sys.argv[2]

    filepath = os.getcwd()
    current_dir = os.path.basename(filepath)
    edit_structure_ase(filename_input,filename_output)
cifファイルの読み込み、書き込みはaseのase.io.read, ase.io.writeを用いて行っています。表面構造はase.build.surfaceを用いて作成しています。
表面方向や層数、真空領域の幅はase.build.surfaceの直前の部分で指定しています。
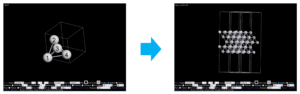
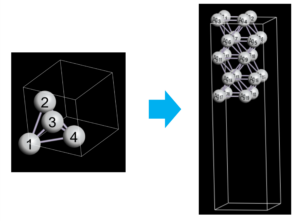
上記のコードを用い、
$ python3 surface_builder_ase.py input.cif output.cifとすることで、Ag(111)の表面構造(スラブ構造)を作ることができます。構造はOpenMX ViewerやVESTAによって、簡単に可視化することができます。下図の左は元のプリミティブセルの構造であり、右は作成された表面構造をOpenMX Viewerで可視化したものです。
※ 面方向ではなく、格子ベクトルa, bを指定して、その格子ベクトルの張る面を表面とする場合は、ase.build.cutを用います。以下はそのコードの例です。
'''
Surface builder by using ASE (https://wiki.fysik.dtu.dk/ase/index.html)
    * Installation
        https://wiki.fysik.dtu.dk/ase/install.html

    * Usage
        Prepare a ciffile of a primitive cell
        and information of a surface Miller index and the number of layers.
        Execute the following:
        $ python3 surface_builder_ase.py input.cif output.cif

'''

import os
import sys
import numpy as np

def edit_structure_ase(filename_input,filename_output):
    ### Reference:
    ### https://wiki.fysik.dtu.dk/ase/ase/atoms.html
    ### https://wiki.fysik.dtu.dk/ase/ase/build/surface.html?highlight=ase%20build%20surface#ase.build.surface
    ### https://wiki.fysik.dtu.dk/ase/ase/build/tools.html

    from ase import io
    from ase import Atoms
    from ase.build import surface, cut, add_vacuum
    from ase.build import root_surface, root_surface_analysis

    #####################
    ### read cif file ###
    #####################
    atoms_input = io.read(filename=filename_input)


    #####################
    ### build surface ###
    #####################
    ### ase.build.surface(lattice, indices, layers, vacuum=None(Ang), tol=1e-10, periodic=False)
    #atoms = surface(atoms_input, (1, 1, 1), 5, vacuum=10.0) # system, Miller index, number of layers
    #atoms = atoms_input
    ### ###


    ################
    ### cut cell ###
    ################
    ###ase.build.cut(atoms, a=(1, 0, 0), b=(0, 1, 0), c=None, clength=None, origo=(0, 0, 0), nlayers=None, extend=1.0, tolerance=0.01, maxatoms=None)
    atoms = cut(atoms_input,  a=(1, 1, 0), b=(-1, 1, 0), nlayers=5)
    add_vacuum(atoms, vacuum=10.0)


    ######################
    ### write cif file ###
    ######################
    io.write(filename=filename_output, images=atoms)

    return

if __name__ == '__main__':
    filename_input=sys.argv[1]
    filename_output=sys.argv[2]

    filepath = os.getcwd()
    current_dir = os.path.basename(filepath)
    edit_structure_ase(filename_input,filename_output)
スーパーセル、原子の置換・削除
ASEではAtomsという構造体を用いて、スーパーセルの作成(repeat)、原子の置換(get_chemical_symbols, set_chemical_symbolsの利用)、原子の削除(pop)を簡単に行うことができます。
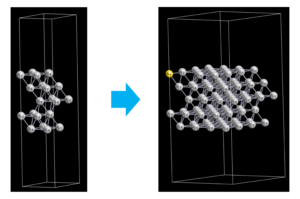
以下のコードでは、先ほどのAg(111)表面構造で、2×2のスーパーセルを作り、1番目の原子をAg→Auに置換、2番目の原子を削除しています。
'''
Surface builder by using ASE (https://wiki.fysik.dtu.dk/ase/index.html)
    * Installation
        https://wiki.fysik.dtu.dk/ase/install.html

    * Usage
        Prepare a ciffile of a primitive cell
        and information of a surface Miller index and the number of layers.
        Execute the following:
        $ python3 surface_builder_ase.py input.cif output.cif

'''

import os
import sys
import numpy as np

def edit_structure_ase(filename_input,filename_output):
    ### Reference:
    ### https://wiki.fysik.dtu.dk/ase/ase/atoms.html
    ### https://wiki.fysik.dtu.dk/ase/ase/build/surface.html?highlight=ase%20build%20surface#ase.build.surface
    ### https://wiki.fysik.dtu.dk/ase/ase/build/tools.html

    from ase import io
    from ase import Atoms
    from ase.build import surface, cut, add_vacuum

    #####################
    ### read cif file ###
    #####################
    atoms_input = io.read(filename=filename_input)


    #####################
    ### build surface ###
    #####################
    indices = (1,1,1)  # Miller index
    layers = 5 # number of layers
    vacuum = 10.0 # vacuum thickness

    ### ase.build.surface(lattice, indices, layers, vacuum=None(Ang), tol=1e-10, periodic=False)
    atoms = surface(atoms_input, indices, layers, vacuum)
    ### ###


    #################
    ### supercell ###
    #################
    atoms = atoms.repeat((2,2,1))


    ##############################
    ### replace atomic species ###
    ##############################
    list_chemical_symbols = atoms.get_chemical_symbols()
    #print("list_chemical_symbols:")
    #print(list_chemical_symbols)
    list_replace_atoms = [] # index starts from 1
    list_replace_atoms = [[1,"Au"]]
    #list_replace_atoms = [[3,"Au"],\
    #                      [4,"Au"]]

    for index in list_replace_atoms:
        list_chemical_symbols[index[0]-1] = index[1]

    atoms.set_chemical_symbols(list_chemical_symbols)
    #print("list_chemical_symbols:")
    #print(list_chemical_symbols)
    ### ###


    ####################
    ### remove atoms ###
    ####################
    list_remove_atoms = [2] # index starts from 1
    #list_remove_atoms = [1] # index starts from 1

    for i, index_atom in enumerate(list_remove_atoms):
        atoms.pop(index_atom-i-1)


    ######################
    ### write cif file ###
    ######################
    io.write(filename=filename_output, images=atoms)

    return

if __name__ == '__main__':
    filename_input=sys.argv[1]
    filename_output=sys.argv[2]

    filepath = os.getcwd()
    current_dir = os.path.basename(filepath)
    edit_structure_ase(filename_input,filename_output)
実行時に”warining”が出る場合がありますが、cifファイルは問題なく作成されています。
実際に構造を作成する場合は、OpenMX ViewerやVESTAなどの可視化ツールで構造を見ながら、どの番号の原子を置換・削除するかなどを確かめながら、作業するとよいです。
終わりに
ここでは、ASEを用いた表面構造(スラブ構造)の作り方を説明しました。ASEにはこれら以外にも様々なツールがあります。その他のツールの詳細はASEのHPより確認することができます。