QUANTUM ESPRESSOのohtaka(物性研スパコン)でのコンパイル・使用例
Last Update:2024/02/08
#2021/3/19に2020年10月に導入されたohtaka用に書き換えました。
また、moduleやconfigureなどの箇所も追記・修正しました。
コンパイル方法:
ここでは、QUANTUM ESPRESSOの物性研スパコンsystem Bへのインストール方法について紹介します。
まず、ohtaka上にインストール用のディレクトリを作ります。名前はなんでも良いのですが、ここではホームディレクトリ直下にcodeというディレクトリを作ります。
mkdir code
次にcode内にQUANTUM ESPRESSOのレポジトリ(q-e)をcloneして、q-eに移動します。
cd code
git clone https://github.com/QEF/q-e.git
cd q-e
インストールをするために、まずmoduleを設定します。
module purge
module load intel_compiler/2020.4.304 intel_mpi/2020.4.304
configureを利用しコンパイルする準備をします。
./configure --enable-openmp --with-scalapack=intel
OpenMP/MPIハイブリッド並列をしたい場合は––enable-openmpをつけてください。
(ohtakaでは1ノードあたりのコア数が128もあるので、ハイブリッド並列にした方が良いと思われます。)
次にmake と打つとオプションについての結果が出力されます。
to install Quantum ESPRESSO, type at the shell prompt:
 ./configure [--prefix=]
  make [-j] target

where target identifies one or multiple CORE PACKAGES:
  pw           basic code for scf, structure optimization, MD
  ph           phonon code, Gamma-only and third-order derivatives
  pwcond       ballistic conductance
  neb          code for Nudged Elastic Band method
  pp           postprocessing programs
  pwall        same as "make pw ph pp pwcond neb"
  cp           CP code: Car-Parrinello molecular dynamics
  tddfpt       time dependent dft code
  gwl          GW with Lanczos chains
  ld1          utilities for pseudopotential generation
  upf          utilities for pseudopotential conversion
  xspectra     X-ray core-hole spectroscopy calculations
  couple       Library interface for coupling to external codes
  epw          Electron-Phonon Coupling with wannier functions
  gui          Graphical User Interface
  examples     fetch from web examples for all core packages
  test-suite   run semi-automated test-suite for regression testing
  all          same as "make pwall cp ld1 upf tddfpt"

where target identifies one or multiple THIRD-PARTIES PACKAGES:
  gipaw        NMR and EPR spectra
  w90          Maximally localised Wannier Functions
  want         Quantum Transport with Wannier functions
  west         Many-body perturbation corrections Without Empty STates
  yambo        electronic excitations with plane waves
  yambo-devel  yambo devel version
  SternheimerGW calculate GW using Sternheimer equations
  plumed       Metadynamics plugin for pw or cp
  d3q          general third-order code and thermal transport codes

 where target is one of the following suite operation:
  doc          build documentation
  links        create links to all executables in bin/
  tar          create a tarball of the source tree
  tar-gui      create a standalone PWgui tarball from the GUI sources
  tar-qe-modes create a tarball for QE-modes (Emacs major modes for Quantum ESPRESSO)
  clean        remove executables and objects
  veryclean    remove files produced by "configure" as well
  distclean    revert distribution to the original status
今回は基本プログラムである”pw” とその後処理用プログラム”pp” をコンパイルします。
make pw
make pp
インストールにかかる時間は約15分です。
無事に終了すると、ディレクトリ“bin” に色々とできます。
以上で、system B上でQUANTUM ESPRESSOを使う準備が完了しました。
実行例:
QUANTUM ESPRESSOのチュートリアルは公式サイト (英語)やこちらのサイト(日本語)が参考になります。
ここではsystem B上での実行例として、チュートリアルサイトにある”シリコンの全エネルギーとバンド構造計算”の練習問題を紹介します。
計算の準備
インプットファイルを用意します。
今回はチュートリアルサイトからダウンロードしたものを利用したいと思います。
ダウンロードしたファイルDay1.tarをホームディレクトリ下に解凍して、以下のコマンドを実行して実行ディクレトリに移動します。
cd ~/Day1/exercise2
また、exercise2/day1_exercise2_instructions.htmlに記載されているように、下記のようなSi.band.inというファイルも作ってください。
Si.band.in
&control
calculation = ‘bands’,
prefix = ‘Si_exc2’,
verbosity = ‘high’
outdir = ‘./tmp/’
pseudo_dir = ‘../pseudo/’
/
&system
ibrav = 2,
celldm(1) = 10.348,
nat = 2,
ntyp = 1,
ecutwfc = 20,
nbnd = 8,
/
&electrons
mixing_beta = 0.7
/ATOMIC_SPECIES
Si 28.086 Si.pbe-rrkj.UPFATOMIC_POSITIONS (alat)
Si 0.0 0.0 0.0
Si 0.25 0.25 0.25K_POINTS (tpiba)
36
0.5 0.5 0.5 1
0.4 0.4 0.4 2
0.3 0.3 0.3 3
0.2 0.2 0.2 4
0.1 0.1 0.1 5
0.0 0.0 0.0 6
0.0 0.0 0.1 7
0.0 0.0 0.2 8
0.0 0.0 0.3 9
0.0 0.0 0.4 10
0.0 0.0 0.5 11
0.0 0.0 0.6 12
0.0 0.0 0.7 13
0.0 0.0 0.8 14
0.0 0.0 0.9 15
0.0 0.0 1.0 16
0.0 0.1 1.0 17
0.0 0.2 1.0 18
0.0 0.3 1.0 19
0.0 0.4 1.0 20
0.0 0.5 1.0 21
0.0 0.6 1.0 22
0.0 0.7 1.0 23
0.0 0.8 1.0 24
0.0 0.9 1.0 25
0.0 1.0 1.0 26
0.0 0.9 0.9 27
0.0 0.8 0.8 28
0.0 0.7 0.7 29
0.0 0.6 0.6 30
0.0 0.5 0.5 31
0.0 0.4 0.4 32
0.0 0.3 0.3 33
0.0 0.2 0.2 34
0.0 0.1 0.1 35
0.0 0.0 0.0 36
最後に実行体をカレントディレクトリにコピーしてきます
cp ~/code/bin/bands.x ./
cp ~/code/bin/pw.x ./
cp ~/code/bin/plotband.x ./
計算の実行
次に、実行のために必要なジョブスクリプト(ohtaka_job.sh)を用意します。
以下のような内容のファイルを作成してください。
#!/bin/sh
#SBATCH -J si_ex
#SBATCH -p i8cpu
#SBATCH -N 1
#SBATCH -t 30:00
#SBATCH --exclusive

module purge
module load intel_compiler/2020.4.304 intel_mpi/2020.4.304

srun -n 32 -c 4  ./pw.x -nk 32 < Si.scf.in   > Si.scf.out
srun -n 32 -c 4  ./pw.x -nk 32 < Si.band.in  > Si.band.out
srun -n 32 -c 4  ./bands.x -nk 32 < bands.in > bands.out
srun -n  1 -c 1 ./plotband.x < Si.plotband.in > Si.plotband.out
Si.scf.in、Si.band.in はそれぞれSCF計算およびバンド計算用のインプットファイルです。
続いて、以下のコマンドを実行して計算を行います。
sbatch ohtaka_job.sh
上述のジョブスクリプトを使うと、数十秒ほどで計算が終了します。
実行結果
実行ディレクトリ直下に全エネルギーやバンド構造などの情報が出力されます。
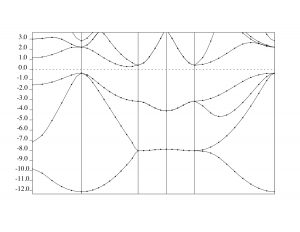
bands.psではバンド構造がSi.band.in内のK_POINTS (tpiba)セクションで指定した通りにプロットされております。(右下図参照。90度回転していると思います。)

今回のチュートリアルの場合、バンド構造は L (½, ½, ½) →Gamma (0, 0, 0→X (0, 0, 1)→W (0, ½, 1) → X (0, 1, 1)→Gamma (0, 0, 0)というパスで出力されています。

